You do not need to wait for a named storm to appear on the weather radar to start protecting your home. By the time a hurricane is 72 hours away from your coastline, the contractors are booked, the hardware stores are empty, and the window to make smart decisions has already closed.
The homeowners who come through hurricane season with the least damage are not the ones who reacted the fastest. They are the ones who prepared the earliest, and followed a system.
This checklist is that system.
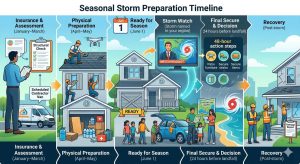
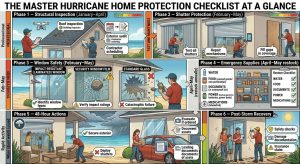
It is organized into six phases that mirror how hurricane risk actually unfolds: annual structural inspection, shutter and window protection, roof hardening, emergency supply preparation, last-48-hour action steps, and post-storm recovery. Work through it once before June 1st. Review the 48-hour section when a storm is named. Share it with anyone in a coastal or storm-prone area who owns a home.
Why Most Hurricane Checklists Fail Homeowners
Most hurricane preparation guides are written as if every homeowner is starting from scratch the week before a storm. They list the basics, buy water, fill your gas tank, charge your phone without addressing the structural decisions that determine whether your home sustains $800 in cleanup costs or $80,000 in reconstruction.
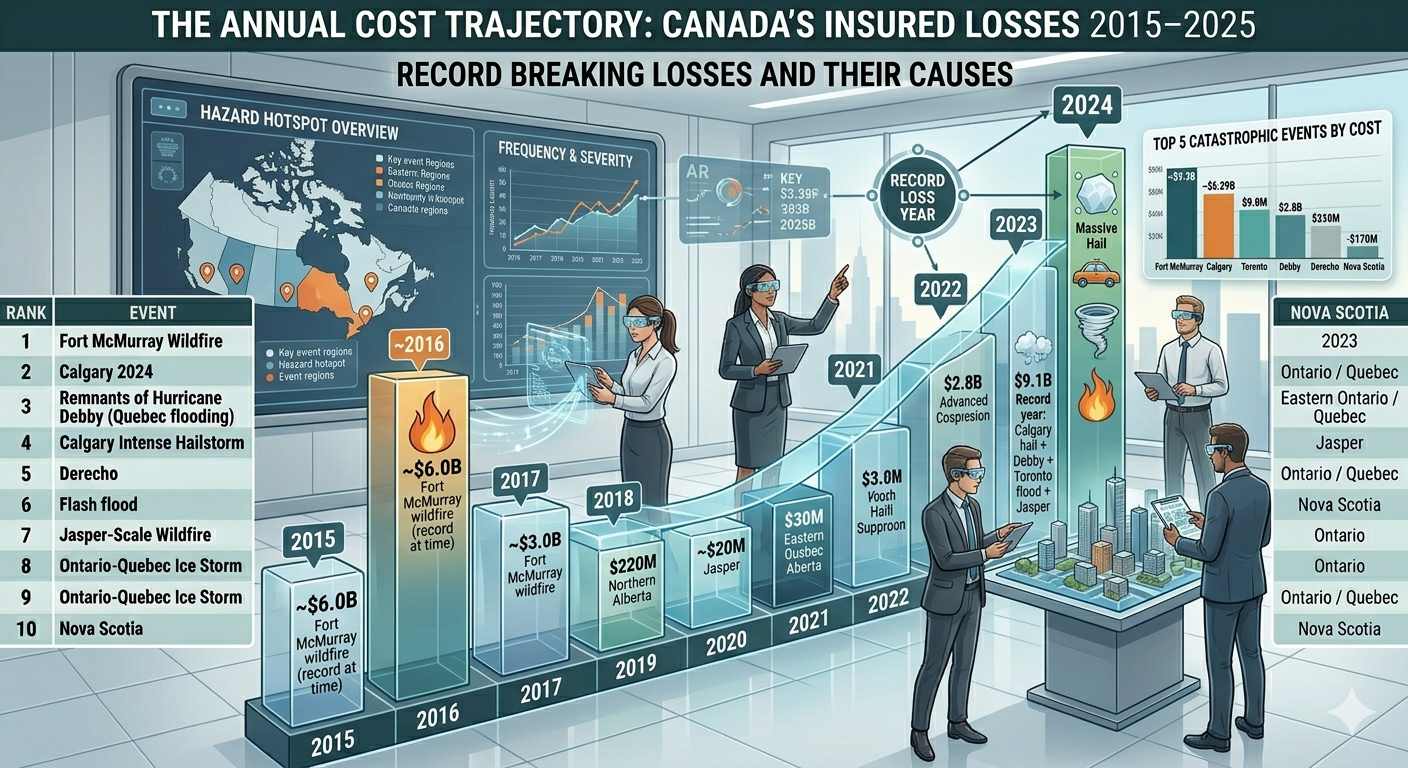
Every hurricane season, roof failures that could have been prevented account for the majority of residential property losses across the Gulf Coast. Windows and doors are the most common entry points for wind and water damage. And yet most checklists spend more words on bottled water quantities than on the shutter and window protection systems that actually determine structural survival.
This checklist does not make that mistake. It starts with the structure, because protecting the envelope of your home is what protects everything inside it.
Before You Begin: Know Your Zone and Your Timeline
Official Atlantic Hurricane Season: June 1 – November 30
June 1st through November 30th is the official Atlantic hurricane season, according to NOAA, although earlier or later storms are possible. Your preparation timeline should work backward from June 1st, not forward from the day a storm is named.
The recommended action windows are:
 The single most important rule: any structural work, roof repairs, shutter installation, window upgrades, must be completed before a named storm enters your forecast cone. Once a storm is named, licensed contractors in hurricane zones are fully booked within hours.
Phase 1 – Annual Home Structural Inspection
Complete this phase between January and April, before contractor schedules fill.
Roof Inspection Checklist
Your roof is the first and most critical line of defense during a hurricane. Inspect early: get a professional roof inspection before June 1st to catch small issues before 130-mph winds expose them. A professional inspection can identify vulnerabilities like loose shingles, compromised flashing, and aging materials that are minor fixes now but major failures in 130-mph winds.
A licensed roofing inspector will assess the following – and so should you, from the ground, before calling them:
Visual ground-level inspection (binoculars recommended):
- Missing, cracked, curling, or lifted shingles anywhere on the roof surface
- Metal flashing around chimneys, skylights, vents, and wall transitions showing gaps, rust, or separation
- Gutters sagging, pulling away from the fascia, or showing visible blockages
- Roof line appearing uneven or showing any visible sag or depression
- Soffit or fascia boards showing rot, paint failure, or physical damage
Attic-level inspection (do this yourself before the professional visit):
- Water stains on roof decking or insulation, any stain indicates an existing leak
- Daylight visible through the roof at any point, any light penetration means water can enter
- Soft spots or spongy feel in roof deck boards where they can be touched
- Inadequate ventilation, improper airflow accelerates decking deterioration
What a licensed roofing contractor will additionally check:
- Fastener security across all shingles, loose fasteners are a primary failure point in high winds
- Shingle seal strip integrity, strips degrade with age and UV exposure
- Hurricane strap and clip connections at the roof-to-wall junction
- Secondary water barrier condition, the layer beneath shingles that prevents water intrusion if shingles fail
Professional inspections remain invaluable for identifying hidden vulnerabilities. Licensed contractors check fastener security, test shingle seal strength, and evaluate your roof deck’s structural integrity. In coastal areas, they will assess salt corrosion on metal components and verify you are using appropriate stainless steel Type 316 fasteners, required within 15 miles of saltwater.
Hurricane-resistant roofing upgrades to consider:
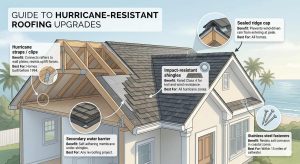
Proactively helping protect your home may earn discounts on your homeowner’s insurance. Some states even require insurance providers to offer discounts to homeowners who observe hurricane-related building codes.
Exterior Structural Inspection Checklist
Beyond the roof, your home’s exterior envelope needs annual review:
- All exterior doors – test for secure fit in frame; check for gaps at threshold and sides
- Garage door – the largest, most vulnerable opening in most homes; verify it is rated for wind pressure or install a bracing kit
- Foundation vents – screen or seal to prevent water entry during storm surge
- Exterior walls – check for cracks in stucco or siding that could allow water intrusion under wind pressure
- Drainage around the foundation – ensure grading slopes water away from the home; clear any blockages
- Trees and overhanging branches – dead branches within falling distance of the roof or windows should be removed by an arborist before storm season, not during it
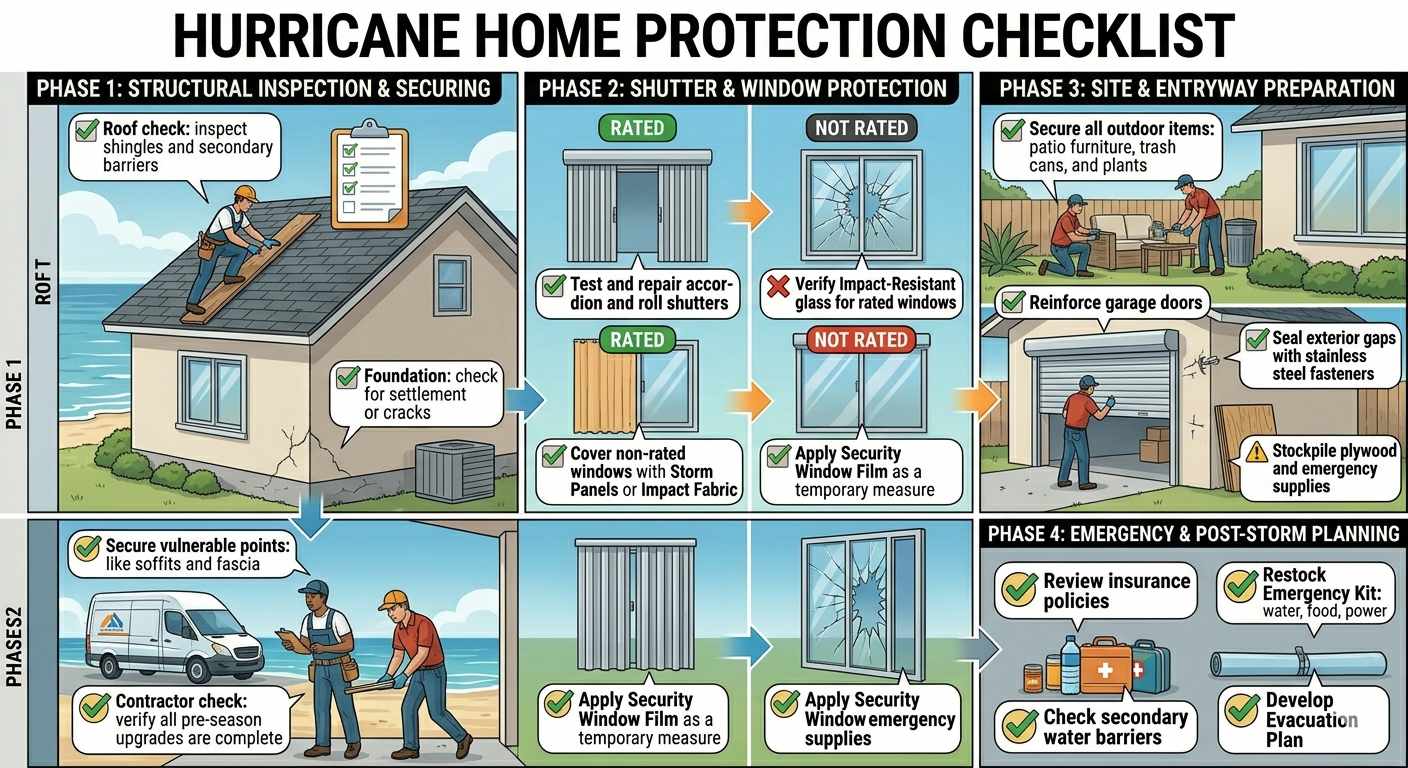
Phase 2 – Shutter Protection: Your Home’s Most Important Storm Investment
Of all the structural preparations available to a homeowner in a hurricane zone, window and door protection is the single decision that most directly determines whether the envelope of your home stays intact during a storm. Once windows or doors fail under hurricane-force winds, internal pressure rapidly builds inside the structure, and roof failure typically follows within seconds.
Windows and doors are the entryways that need the most protection when the storm rages. Even if the wind is not terribly strong, the flying debris can break the glass in your windows and allow the weather to wreak havoc inside your home. As soon as your home is breached, the damage to your property can be overwhelming and extensive. In many cases, the roof can collapse due to the upward pressure created when the envelope is compromised.
Understanding Your Shutter Options
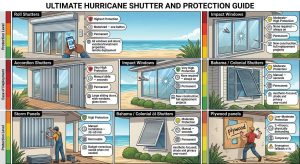
Roll Shutters: Why Emergency Managers and Insurers Recommend Them First
Roll shutters are the protection type most consistently recommended by emergency management professionals, for a specific reason that goes beyond raw impact resistance: they can be deployed in seconds, from inside the home, even with a storm already approaching.
Talius’s S.H.I.E.L.D. StormLock roll shutters can be networked and controlled remotely through a proprietary smartphone app. As Talius COO Cal Johnson explains: “Imagine you’re away from your home, vacation home, or business and a hurricane is bearing down on your neighborhood. With the Talius S.H.I.E.L.D. StormLock system, you can remotely secure your property from anywhere.”
Talius roll shutters are tested to withstand hurricane force winds up to 88 mph and deflect the impact of flying debris at 30 mph. Strong, secure, and durable, they glide easily into place when you need them and retract into an overhead panel box when you don’t.
For vacation properties, investment homes, and anyone who travels during hurricane season, remote deployment capability is not a convenience feature, it is the difference between a protected property and an unprotected one when a storm tracks faster than expected.
Shutter Protection Checklist
Complete this checklist during Phase 1 (January–April), not when a storm is named:
- Inventory every opening – list every window, exterior door, sliding glass door, and skylight by size; this is your shutter specification list
- Identify your protection type – permanent (roll shutters, accordion, impact windows) vs. deployable (storm panels, fabric, plywood)
- Verify all shutters open and close properly – test every shutter mechanism before storm season; motors, tracks, and locks need annual lubrication and inspection
- Check all locking hardware – shutter locks and fasteners should be tight, corrosion-free, and function smoothly
- Confirm panel storage and accessibility – removable storm panels should be stored within reach, labeled by window, and free of corrosion
- Check motorized systems – test remote controls and app connectivity; replace batteries in any battery-backup motor systems
- Inspect track and guide rails – clear any debris, lubricate guide rails, and check for bending or separation at anchor points
- Identify gaps in your coverage – any window or door without a rated protection system is a vulnerability; plan to address it before June 1st
For properties without permanent shutters – the plywood fallback:
If permanent shutters are not yet installed, pre-cut plywood panels are the emergency fallback — not a substitute for rated protection. Install hurricane shutters or pre-cut plywood panels for all windows and glass doors. Pre-cut panels should be at minimum ⅝-inch CDX plywood, cut to size in advance, labeled for each window, and stored on-site. Pre-cut them in February or March when lumber is available and unhurried, not at 4am during a storm watch.
Phase 3 – Window Safety: Impact Glass, Films, and What Actually Works
Beyond shutters, your windows themselves are either an asset or a liability in a hurricane. Understanding the difference between window types, and what can and cannot be done to improve unprotected glass is essential before storm season.
Window Type Safety Comparison
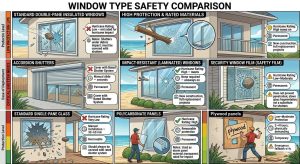
The safety film misconception:
Window security film is widely sold as a hurricane preparation product. It deserves an honest assessment. Film does not prevent glass from breaking, it holds shattered fragments together, reducing the spray of glass shards inside the home and slowing the breach. It does not meet any hurricane impact standard as a standalone protection method. It should be used in addition to a rated shutter system, never instead of one.
Impact windows and doors blend right in with your home, designed to resist shattering with laminated glass. The window or door is coated with a shatter-resistant film, and even if the outer layer is broken, your property suffers no damage. The inner PVB membrane holds the glass together, making it a top choice for storm protection. The key distinction: this refers to manufacturer-applied laminated interlayers in impact-rated windows, not aftermarket film applied to standard glass.
Window Safety Inspection Checklist
- Identify every window by type: impact-rated, standard double-pane, or single-pane
- Verify impact-rated windows show no chips, cracks, or frame separation, a compromised impact window loses its rating
- Check all window seals and weatherstripping – gaps allow wind-driven rain to penetrate even intact windows
- Confirm all window locks function properly – a locked window resists wind pressure better than an unlocked one
- Test every sliding glass door track and lock – sliding doors are disproportionately vulnerable to wind failure if the track or lock mechanism is worn
- Identify any window without a rated shutter – these are your priority installations before June 1st
Phase 4 – Emergency Supply Preparation
Structural protection keeps the storm out. Emergency supplies keep your household functional after it passes, during the period when power may be out, roads may be impassable, and resupply may be days away.
FEMA recommends visiting ready.gov/kit for checklists to plan for your family’s needs. Save digital backups of insurance policies, deeds, birth certificates, and other important documents. Seal the originals in plastic bags and store them upstairs or on a high shelf. If you evacuate, take them with you.
Emergency Supply Checklist
Water and Food:
- 1 gallon of water per person per day, for a minimum of 7 days (not the 3-day minimum extended outages are common after major storms)
- 7-day supply of non-perishable food requiring no cooking or minimal preparation
- Manual can opener
- Infant formula, pet food, or dietary-specific supplies as applicable
Power and Communication:
- Battery-powered or hand-crank NOAA weather radio – this is your lifeline when cell networks fail
- Portable power bank (fully charged) for phones and small devices
- Flashlights with extra batteries – one per household member
- Generator (if applicable) – stored with fuel stabilizer added; test-run before season
- Carbon monoxide detector – critical if using a generator; never run indoors or in attached garage
Medical and Safety:
- 30-day supply of all prescription medications, refill before storm season, not after a storm watch is issued
- First aid kit including antiseptic, bandages, gauze, and any personal medical supplies
- N95 masks, useful during post-storm cleanup when mold spores and debris particulates are prevalent
- Work gloves and safety glasses for post-storm cleanup
Financial and Documents:
- Cash in small bills, ATMs and card readers are frequently offline after storms
- Copies of all insurance policies (home, flood, auto) in a waterproof bag
- Photo ID, passport, and social security documents in waterproof bag
- List of emergency contacts, account numbers, and insurance claim contact information
Fuel and Transportation:
- Full tank of gas at least 72 hours before potential landfall, stations run out within 24 hours of a storm watch
- Know your evacuation route and alternate routes; visit your county’s emergency management website and identify your evacuation zone now
Phase 5 – The 48-Hour Action Checklist
When a named storm enters your forecast cone and a watch or warning is issued for your area, the structural work is done. Phase 5 is about securing, documenting, and deciding.
Exterior securing – complete these first:
- Bring all patio furniture, grills, umbrellas, planters, decorative items, bikes, and outdoor toys indoors or into a secured garage, bring trash cans, bikes, patio furniture, and anything else winds could pick up inside. Secure anything that would be unsafe to bring inside, like barbeques or gas canisters.
- Deploy all shutters, verify every window, door, and skylight is covered and locked
- Clear gutters of any remaining debris and verify downspouts are directing water away from the foundation
- Anchor or remove any portable propane tanks, floating tanks in floodwater are a serious hazard
- Park vehicles in a garage if available; if not, move away from trees and low-lying areas
Interior securing:
- Move important documents, electronics, and valuables to upper floors or high shelves
- Fill bathtubs with water as an emergency reserve (for flushing toilets if water service is interrupted)
- Charge all devices, power banks, and battery-powered equipment to 100%
- Unplug major appliances to protect against power surge damage when electricity is restored
- Turn refrigerator and freezer to their coldest settings, leave your refrigerator and freezer plugged in to maintain food safety as long as possible
Documentation – the step most homeowners skip:
- Photograph every room of your home with clear, time stamped photos before the storm, this is your baseline for insurance claims
- Video-walk the exterior of the home, capturing the condition of the roof (from the ground), shutters, windows, and yard
- Upload photos to cloud storage so they survive even if your phone or computer does not
- Most homeowners and renters insurance does not cover floods. Just one inch of floodwater can cause thousands of dollars in damage, and hurricanes can bring rain and storm surge hundreds of miles from the coast. Verify you have a separate flood insurance policy before the storm, a National Flood Insurance Program policy has a 30-day waiting period and cannot be purchased during a storm watch.
Evacuation decision:
- Know your evacuation zone. If local officials issue a mandatory evacuation for your zone, leave. No amount of structural preparation makes staying in a mandatory evacuation zone a rational decision.
- Have your go-bag ready: medications, documents, phone charger, cash, water, one change of clothing per person
- Know your destination, a confirmed address, not a plan to “find somewhere”
Phase 6 – Post-Storm Inspection and Recovery
Do not enter your home or begin exterior inspection until local emergency management officials confirm it is safe to do so. Active electrical hazards, unstable trees, and flood contamination make post-storm movement dangerous even after winds subside.
Post-Storm Safety and Inspection Checklist
Immediate safety checks (before entering home):
- Check for downed power lines near your property, treat all downed lines as live; call your utility company
- Smell for gas before entering, if you detect gas, do not enter; call your gas utility from outside
- Inspect the exterior foundation for visible cracking or shifting before entering
- Check that your roof appears structurally intact from the ground before entering the attic
Interior inspection:
- Check ceilings for water stains or active dripping, prioritize finding the entry point before water spreads
- Inspect windows and doors for infiltration, even intact windows can allow wind-driven rain under frames
- Check electrical panel for water exposure, do not touch a wet electrical panel; call an electrician
- Look for standing water in the garage, basement, or low points of the home
Documentation for insurance:
- Photograph all damage, exterior, interior, roof (from the ground), every room, before beginning any cleanup
- Maintain communication records with your insurance company. Save all receipts for emergency repairs as these costs are often reimbursable through insurance. Never sign contracts with door-to-door contractors appearing immediately after storms, verify all contractors through your state’s Department of Labor, Licensing, and Regulation.
- Contact your insurance company and open a claim before beginning non-emergency repairs
Emergency tarping:
- If your roof is visibly breached, contact a licensed roofing contractor for emergency tarping , professional contractors can install temporary tarping using FEMA Operation Blue Roof standards, which provides 30-day protection for qualified properties.
What This Checklist Does Not Cover – And Why That Matters
This checklist focuses on home structural protection and emergency preparation. It does not cover community-level emergency management, flood map assessment, business continuity planning, or multi-family building protocols, each of which warrants its own dedicated resource.
For community and regional emergency management resources, the following organizations publish authoritative guidance used by emergency managers across North America:
FEMA (Federal Emergency Management Agency) – ready.gov, the primary source for household emergency preparedness guidance in the United States, including hurricane-specific checklists, evacuation planning tools, and the National Flood Insurance Program portal.
National Hurricane Center (NHC / NOAA) – nhc.noaa.gov, real-time storm tracking, official watches and warnings, and storm surge forecasting for all Atlantic and Eastern Pacific storms.
Insurance Institute for Business and Home Safety (IBHS) – ibhs.org, publishes the FORTIFIED Home standard, the most widely recognized building standard for hurricane-resistant construction and retrofit.
Public Safety Canada – getprepared.gc.ca, the Canadian equivalent of FEMA’s ready.gov; publishes 72-hour household emergency kit guidance for Canadian residents in hurricane and storm-prone regions.
Protect Your Home Before the Season Starts
The single most common mistake homeowners in hurricane zones make is treating storm preparation as a reactive process. The contractors, the materials, and the time to make good decisions are all available in February, March, and April. They are not available when a Category 3 storm is 48 hours from your coastline.
Permanent roll shutter systems, like those manufactured by Talius, exist precisely for the scenario where you do not have 48 hours of advance notice, or where you are not home when the forecast changes. With motorized roll shutters that can be controlled remotely via smartphone, you can secure your property from anywhere, your home, your vacation property, or your business, regardless of where you are when the storm develops.
The structural investments you make between January and May are the ones that determine whether your home survives hurricane season intact. Every item on this checklist serves that single goal.
Start with Phase 1. Schedule your roof inspection this month. Test your shutters this weekend. Your future self, standing in front of an intact home the morning after a hurricane, will have made those decisions.